

Table of Contents
- Understanding Traditional Sourdough Starter Basics
- How to Maintain a Sourdough Starter
- Sourdough Fermentation Process Explained
- Step-by-Step Mixing and Gluten Development
- Shaping, Proofing, and Baking Traditional Sourdough
- Benefits of Long Fermentation Sourdough
- Troubleshooting Common Sourdough Problems
- Conclusion
- Frequently Asked Questions
Last Updated: September 23, 2026
Understanding Traditional Sourdough Starter Basics
A sourdough starter is a living culture of wild yeast and bacteria that leavens bread without commercial yeast, and it is where all traditional sourdough baking methods begin. Traditional sourdough baking methods begin here, because everything downstream, from oven spring to crumb structure, depends on the health of this culture. At Isaacs Artisan Sourdough, we build every loaf on a starter maintained the same way bakers have done it for generations: flour, water, time, and patience.
Wild Yeast and Lactobacillus: The Living Culture
Wild yeast produces carbon dioxide, which physically lifts the dough. Lactobacillus produces lactic and acetic acids, creating the tang and extending shelf life. A healthy starter smells pleasantly sour, not sharply alcoholic, and doubles reliably within a predictable window after feeding.
How to Maintain a Sourdough Starter
Consistency matters more than technique: a starter kept at a steady temperature and fed regularly will outperform one fed sporadically, even with premium flour.
Feeding Schedules and Hydration Percentage
Most home bakers feed once or twice daily at room temperature, or weekly if refrigerated. Hydration percentage describes the water-to-flour ratio by weight: a 100% hydration starter uses equal weights of each, producing a batter-like consistency. Lower hydration starters are stiffer and ferment more slowly.
- Daily feeding: discard most of the starter, then add fresh flour and water in your chosen ratio
- Refrigerated storage: feed weekly and let it warm up before baking
- Discard: never throw it away; it becomes pancakes, crackers, and flatbread
Sourdough Fermentation Process Explained
The sourdough fermentation process explained in practical terms is a two-stage sequence: bulk fermentation, where the whole mass rises, and final proof, where the shaped loaf rises one last time. Fermentation is driven by wild yeast activity and modulated by temperature, inoculation rate, and hydration percentage, understanding how those three interact separates bakers who follow a recipe from bakers who can read their dough.
The Two Stages, and What Each One Is Doing
Bulk fermentation begins when the starter is mixed into the dough and ends when you divide and shape. Wild yeast consumes sugars and releases carbon dioxide, lactobacillus produces lactic and acetic acids, and gluten develops until the dough turns smooth, domed, and elastic. Most home bakers run bulk 3 to 6 hours at room temperature, but that range is meaningless without knowing your dough temperature.
Temperature, Inoculation, and Hydration: The Three Levers
Dough temperature is the single most powerful variable. Wild yeast is most active between roughly 75°F and 82°F; below 70°F bulk can stretch past 8 hours, and above 85°F yeast races ahead of bacteria for a fast rise with flat flavor. Aim for 78°F and adjust water temperature accordingly, cooler in summer, warmer in winter.
Sensory Indicators of Fermentation
You cannot rely on a timer alone, because the clock only tells you what happened in someone else's kitchen. Read these cues instead:
- Dome and jiggle: the dough should look domed and wobble like set gelatin when you shake the bowl. A flat top means it has not risen enough; a collapsing dome means it has gone too far.
- Bubble activity: visible bubbles on the surface, along the sides of the bowl, and in the streaks left behind when you tilt the container. Small, uniform bubbles suggest healthy, even fermentation.
- Smell: pleasantly sour and yeasty, with a faint yogurt-like note. Sharp acetone means the culture is starving and over-fermented. A raw, floury smell means it has barely started.
- Feel: airy and slightly tacky, with a soft resistance when you press a floured finger into the surface. Dense and tight means under-fermented; slack and sticky with no rebound means over-fermented.
- Poke test: press a floured finger about half an inch into the dough. If it springs back immediately and completely, bulk is not done. If it springs back slowly and leaves a faint indentation, it is ready. If the dent stays put, it is over-proofed.
A Practical Timeline
A typical same-day bake at 78°F with a 20% inoculation: mix and rest 30 to 60 minutes for autolyse, add starter and salt, stretch and fold every 30 minutes for 2 hours, then let bulk finish undisturbed 1 to 3 hours. Shape, bench rest 20 to 30 minutes, final proof 1 to 2 hours at room temperature or overnight refrigerated, then bake.
Step-by-Step Mixing and Gluten Development
Mixing builds gluten development, the protein network that traps gas and gives bread its structure. Traditional methods rely on time and gentle handling rather than heavy kneading.
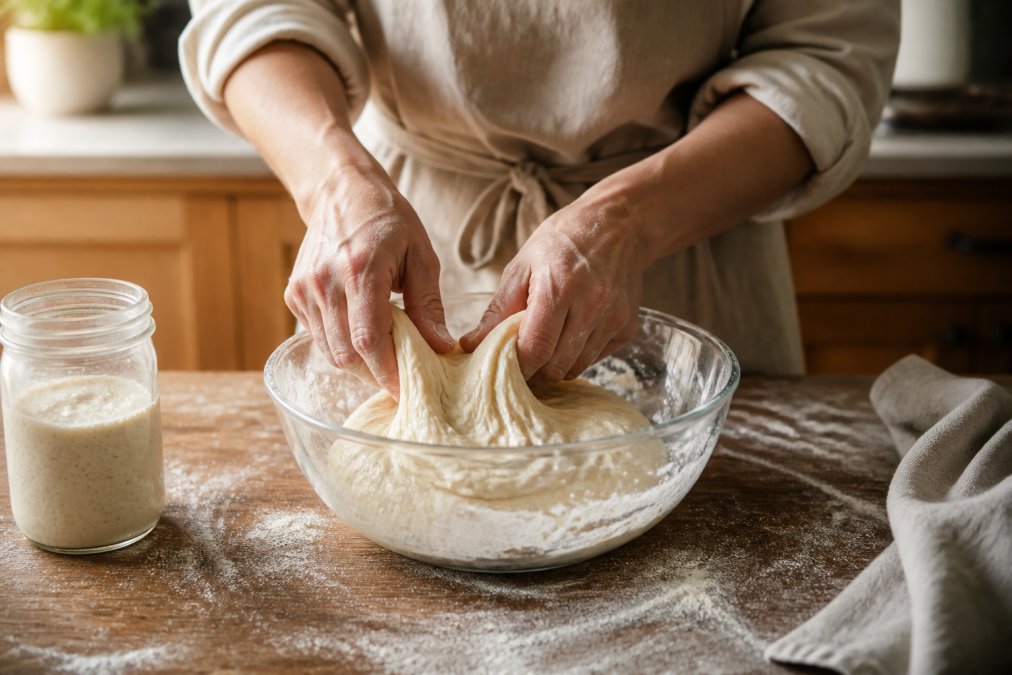
Autolyse, Stretch and Fold, and Coil Fold
Autolyse is the rest after mixing flour and water but before adding starter and salt; it hydrates the flour and begins gluten formation with zero effort. Then:
- Mix in the starter, then the salt
- Stretch and fold: lift one side of the dough, stretch it upward, and fold it over the center
- Rotate the bowl and repeat around the circumference
- Coil fold: lift the dough from the center, let the ends tuck underneath, and set it back down
- Repeat every 30 minutes during early bulk fermentation
Shaping, Proofing, and Baking Traditional Sourdough
Shaping sets the final structure, proofing lets it rise, and baking transforms it. Each phase rewards attention to fermentation activity and temperature.
Scoring, Dutch Oven, and Steam Injection
Scoring is the deliberate slash across the top of the loaf, made with a lame, that controls where the bread expands. Without it, the loaf tears unpredictably. A Dutch oven traps steam, keeping the crust pliable during oven spring so the loaf expands fully before the crust sets. Steam injection does the same in a professional oven.
- Bench rest: let shaped dough relax before final shaping
- Proof basket: supports the loaf during final proof
- Retard: cold-proof overnight in the refrigerator for deeper flavor
- Crust caramelization: the Maillard reaction and sugar caramelization that create color and crackle
Benefits of Long Fermentation Sourdough
Long fermentation changes the bread itself, not just its flavor. Extended fermentation allows the lactobacillus culture to predigest starches and gluten, which many people find easier to digest than fast-risen commercial bread. That is the core practical benefit, and why a 4-hour bulk and an 18-hour cold retard produce loaves that behave differently in the body and on the plate.
What Actually Happens During a Long Ferment
During extended fermentation, three things occur that do not happen in a fast commercial rise. First, flour enzymes, amylase and protease, break down starches into simpler sugars and cleave gluten proteins into smaller peptides. Second, lactobacillus produces lactic acid, lowering pH so spoilage organisms struggle to survive, extending shelf life without preservatives.
Flour Chemistry and Grain Varieties
Flour chemistry determines how much water your dough absorbs, how strong your gluten becomes, and how fast fermentation proceeds. Three variables matter most: protein content, enzyme activity, and bran and germ.
| Flour Type | Water Absorption | Fermentation Speed | Best For |
|---|---|---|---|
| Bread flour | High | Moderate | Open crumb structure |
| Whole wheat | Very high | Fast | Nutty flavor, nutrition |
| Rye | High | Very fast | Dense, tangy loaves |
| All-purpose | Moderate | Moderate | Beginners, everyday baking |
| Spelt | Moderate | Fast | Nutty, extensible doughs |
| Einkorn | Low | Moderate | Delicate, ancient-grain loaves |
Practical Trade-Offs
The trade-off is time and predictability. A long ferment demands attention to temperature and sensory cues and punishes bakers who walk away. A short commercial rise is fast and consistent but yields less flavor, shorter shelf life, and none of the enzymatic breakdown that makes traditional sourdough easier to digest. For bakers willing to learn the rhythm of their starter and kitchen, the long ferment is the entire point, and why the method has survived for thousands of years.
Troubleshooting Common Sourdough Problems
Most failures trace back to fermentation, not technique. How to diagnose the frequent problems:
- Dense, gummy crumb: usually underproofed or underfermented; extend bulk time
- Flat, no oven spring: weak starter or overproofed dough; check fermentation activity first
- Tough, pale crust: insufficient steam or too low a baking temperature
- Sour but no rise: bacterial activity outpacing yeast; adjust temperature and feeding
- Starter not doubling: cold kitchen or old flour; move it somewhere warmer and feed fresh
Conclusion
Sourdough rewards patience more than equipment. The variables that matter most, starter health, fermentation time, and temperature, are all things you control with attention rather than money. Isaacs Artisan Sourdough exists for families who want that same traditional, long-fermented quality without the daily upkeep: handcrafted loaves, small-batch quality, and kosher-certified bread delivered fresh to your door on a weekly schedule you can rely on.
Frequently Asked Questions
What are the core steps in traditional sourdough baking?
Traditional sourdough baking follows a sequence: maintaining an active starter, mixing flour and water, autolyse rest, adding starter and salt, bulk fermentation with stretch and folds, shaping, final proof (often retarded overnight in the refrigerator), scoring, and baking in a Dutch oven with steam. Each step builds gluten strength and fermentation activity, and the total timeline from mix to loaf typically spans 18 to 36 hours depending on ambient temperature and inoculation rate.
Why is long fermentation important in traditional sourdough?
Long fermentation lets wild yeast produce carbon dioxide for oven spring while lactobacillus creates lactic and acetic acids that develop flavor and improve digestibility. Extended bulk fermentation also breaks down some gluten and phytic acid, which many people find easier on the stomach. The benefits of long fermentation sourdough include a more complex crust caramelization, an open crumb structure, and a loaf that stays fresh longer than quick commercial yeast breads.
What is the difference between commercial yeast and sourdough starter?
Commercial yeast is a single isolated strain that leavens dough in one to two hours. A sourdough starter is a symbiotic culture of wild yeast and lactobacillus maintained with regular flour and water feedings. The starter ferments more slowly, produces lactic and acetic acids, and gives bread its signature tang, chewy crust, and longer shelf life. Starter also needs ongoing care, while commercial yeast is a one-time addition.
How do you maintain a traditional sourdough starter?
Keep your starter at 100% hydration (equal weights flour and water) in a clean jar. Feed it once daily at room temperature, discarding all but about 50 grams before adding fresh flour and water, or refrigerate it and feed weekly. Look for a domed top, bubbly texture, and a yeasty, slightly sour aroma within four to eight hours of feeding. If a dark liquid forms on top, that is alcohol from fermentation; stir it in or pour it off and feed more frequently.
What makes sourdough bread kosher and artisan?
Kosher certification requires supervision of ingredients, equipment, and the baking process by a reliable kosher authority. Artisan refers to small-batch, hand-shaped loaves made with traditional methods rather than industrial production lines. A loaf can be both: certified kosher ingredients handled under supervision and baked slowly with a long-fermented starter. Ask the bakery for current certification documentation if you keep a kosher kitchen.
How does hydration affect the traditional sourdough process?
Hydration percentage, the ratio of water to flour by weight, changes dough handling and crumb structure. Lower hydration (65 to 70%) gives a stiffer dough that is easier to shape and produces a tighter crumb. Higher hydration (75 to 85%) creates a wetter, more extensible dough that yields an open, airy crumb but requires stronger gluten development and more confident shaping. Beginners often start around 70% and increase as their dough strength improves.
Can I bake traditional sourdough in a home oven without a Dutch oven?
Yes. A Dutch oven traps steam and radiates heat, which helps oven spring and crust caramelization, but you can replicate the effect with a baking stone and a metal pan of boiling water on a lower rack. Preheat the stone for at least 45 minutes at 475°F, load the scored loaf, pour water into the pan, and close the oven. Remove the water pan after 15 minutes to let the crust brown.
How do I know when my sourdough is fully proofed?
Use sensory indicators rather than the clock. A fully proofed dough feels airy and jiggly when you shake the proof basket, has risen about 50 to 75%, and springs back slowly when poked with a floured finger. Under-proofed dough springs back immediately and feels dense; over-proofed dough collapses and smells sharply of acetone. Ambient temperature, inoculation rate, and flour type all shift the timeline, so check every 30 minutes near the end.
If maintaining a starter around a busy week feels like one more thing on the list, let someone else tend the culture. Isaacs Artisan Sourdough bakes fresh daily using traditional methods, offers convenient subscription options, and delivers consistent, kosher-certified sourdough weekly. Subscribe with Isaacs Artisan Sourdough and keep authentic sourdough on your table without the feeding schedule.